.png?height=120&name=wildcloud%20by%20WPCS%20logos%20(1).png)
Upgrading your WordPress & PHP version involves a specific set of steps, different from the standard WordPress update process. This guide provides a detailed overview of how to securely and predictably upgrade your WordPress version on wildcloud.
When it comes to updating WordPress and PHP versions, safety and reliability are paramount. The update process for WordPress, a critical component of your website's infrastructure, should be approached with caution to avoid any unintended disruptions or issues on production sites. That's why wildcloud's update procedure is designed to ensure every update is thoroughly tested before it goes live.
The key to a safe update lies in the creation of a new version first. This step allows you to apply and evaluate changes in a controlled environment, separate from your live sites. By testing in this isolated version, you can identify and address any potential issues without risking the stability of your active sites. Only after confirming that the new version functions flawlessly do you proceed to migrate live sites. This careful, step-by-step approach safeguards your sites against unexpected errors during the update process, ensuring a smooth transition to the latest WordPress and PHP versions.
Let's dive in more detail! 🚀
-
Accessing the wildcloud Console: Begin by logging into your wildcloud console. This is where you will manage the versions and tenants of your WordPress sites.
-
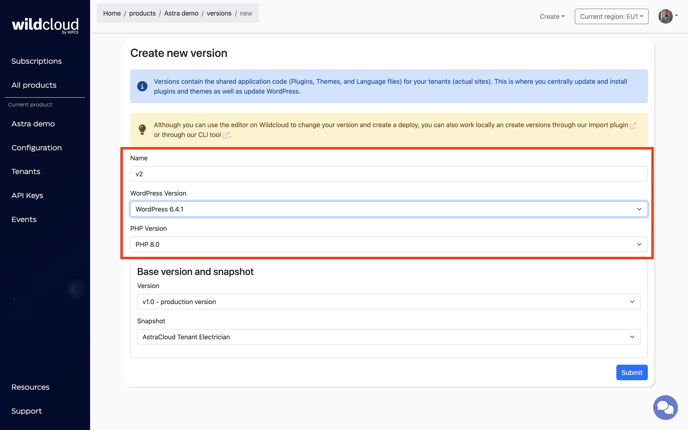
Creating a New Version: Navigate to your product within the console and start creating a new version. This step involves specifying details like the version name and selecting the WordPress version to upgrade to.
- Version Selection: Choose the desired WordPress version for your upgrade. Note that wildcloud only makes a new WordPress version available after thorough testing to ensure stability and the absence of major bugs.
- PHP Version and Base Version: Unless required, leave the PHP version as it is. Choose the base version and snapshots you wish to include in this new version.
-
Deployment and Testing:
- Testing with a Test Tenant: Create a test tenant under the old version and then move it to the new version. Thoroughly test its functionality to ensure that the new WordPress version does not introduce any issues.
-
Updating Existing Tenants:
- Moving Tenants to New Version: After confirming the new version's stability, or fixing any issues found, move all existing tenants to this new version. This process is done through the 'Move to Version' action in the console.
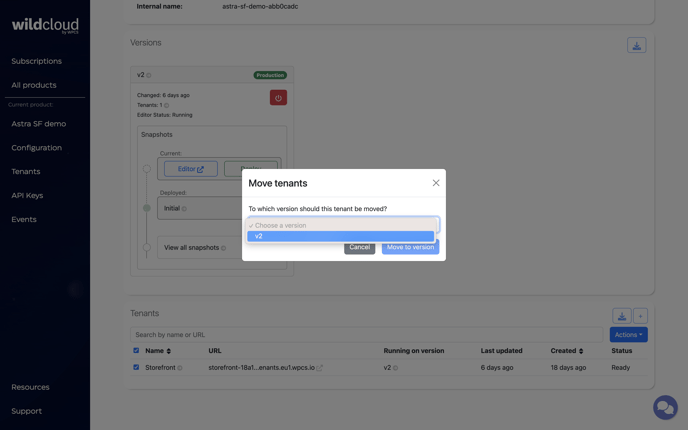
- Verifying Updates: Once the tenants are moved, they should reflect the updated WordPress version. You can verify this by checking the version number in the tenants' WordPress dashboard.
- Moving Tenants to New Version: After confirming the new version's stability, or fixing any issues found, move all existing tenants to this new version. This process is done through the 'Move to Version' action in the console.
-
Final Steps:
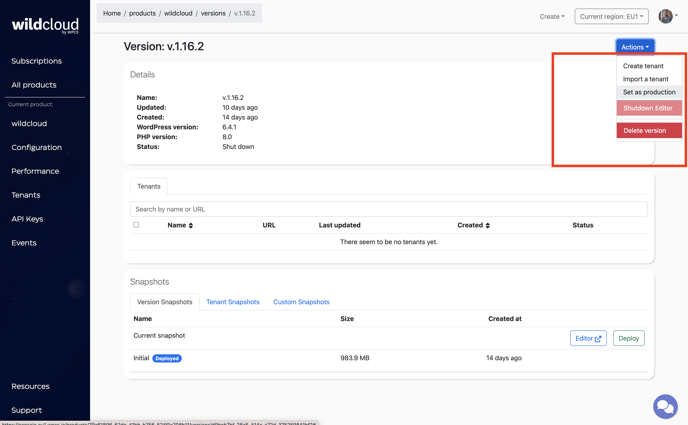
- Set as Production Version: Set the new version as the Production version to ensure that any new tenants are created with this updated version.
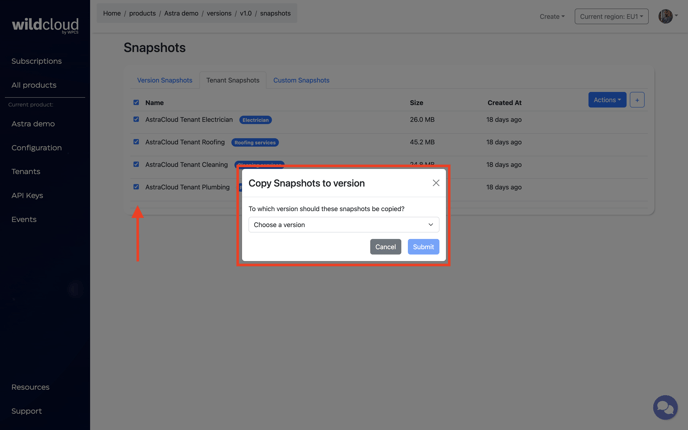
- Updating Tenant Snapshots: If you use Tenant Snapshots, update them to be compatible with the new version.
- Removing Redundant Versions: Once the new version is fully operational and all tenants have been moved, remove the old version to avoid confusion and redundancy.
- Set as Production Version: Set the new version as the Production version to ensure that any new tenants are created with this updated version.
Important Notes:
- Availability of New Versions: wildcloud strives to make new WordPress versions available promptly after their release. However, this can take some time to ensure the safety and compatibility of the new version.
- Downgrading Process: If you need to downgrade the WordPress version, the process is similar, except you will create a new version with the desired lower WordPress version.